Turn Any Old Device into a Home NAS: Old PCs, TV Boxes, and Phones (SATA Storage, SGID, Transmission, Samba, FTP & nftables)
You don’t need expensive dedicated NAS hardware to run a silent, reliable 24/7 home storage server. Retired tech sitting forgotten in your drawers—an old PC, a discarded Android TV Box, or even an old smartphone—can easily become a capable home NAS with headless torrent downloading and high-speed local file sharing.
Choosing Your Hardware: PC vs. TV Box vs. Phone
| Device Type | Typical OS / Setup | Power Draw | Notable Advantages | Key Considerations |
|---|---|---|---|---|
| Old PC / Laptop / Mini PC | Ubuntu Server / Debian (x86_64) |
15W – 45W | Full SATA ports, Gigabit LAN, high CPU power | Higher power consumption; bulkier |
| Old Android TV Box (Amlogic S905/S912, Rockchip) | Armbian (Debian/Ubuntu for ARM) | 2W – 5W | Ultra-low power, silent fanless cooling, extremely cheap | Usually USB 2.0 or 3.0 ports; 100M/1G Ethernet |
| Old Android Phone / Tablet | Termux (proot-distro) or postmarketOS |
2W – 4W | Built-in battery acts as a free UPS against power cuts; built-in Wi-Fi & screen | Single USB port (requires powered USB-C OTG hub) |
Because Debian/Ubuntu bases (and Armbian/Termux-PRoot) share the exact same underlying Linux ecosystem, the setup steps, permissions model, and configuration files in this guide are identical across all three platforms.
What We’ll Build:
- Storage Setup: Connecting SATA drives, 2.5” vs. 3.5” power requirements, TV box/phone brownout prevention, and auto-mounting.
- Server Hostname with
.localPostfix: Zero-configuration local network addressing (nas.local) via mDNS / Avahi. - Setting up a shared directory hierarchy with group inheritance (SGID & ACLs) so all future files and subfolders remain writable by your shared user group.
- Installing and configuring Transmission Daemon for headless torrent downloading.
- Setting up Samba (SMB/CIFS) for native network shares on Windows, macOS, Android, and iOS.
- Setting up FTP (vsftpd) for legacy devices, automated backups, and camera uploads.
- Securing everything with modern nftables (
nft) firewall rules.
1. Storage Setup: Drives, Power Sources, and Mounting
When connecting extra storage to an old PC, TV box, or smartphone, you typically use an onboard SATA 3 port or a USB 3.0 to SATA 3 adapter cable.
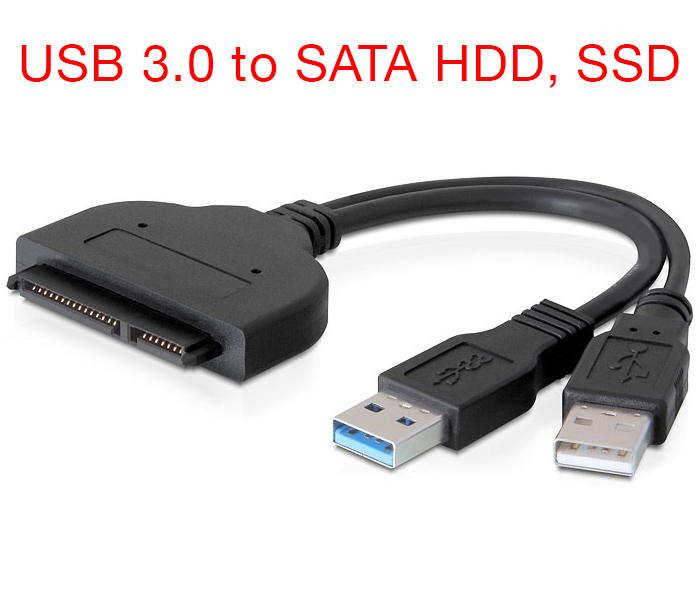
2.5” vs. 3.5” Drives: The Critical Power Difference
One of the most common pitfalls when setting up DIY NAS storage with an external adapter is drive detection failure or unexpected reboots caused by insufficient power.
| Form Factor & Drive Type | Voltage Needed | Bus-Powered (USB Alone)? | External Power Source Needed? |
|---|---|---|---|
| 2.5-inch SATA SSD | 5V DC (~0.5A - 1A) | Yes (on PCs with USB 3.0 delivering 5V @ 0.9A) | No (unless on low-power TV box/phone) |
| 2.5-inch Laptop HDD | 5V DC (~1A) | Yes (on PCs with USB 3.0) | Recommended on TV box/phone |
| 3.5-inch Desktop HDD | 5V DC + 12V DC | NO (Standard USB only outputs 5V) | YES: 12V DC Adapter strictly required |
Why You Must Provide External Power for 3.5” Drives
- Dual-Voltage Architecture:
- A hard drive’s PCB controller logic and cache memory operate on 5V DC.
- However, a 3.5” mechanical drive contains large, heavy aluminum platters and high-speed spindle motors (5,400 to 7,200 RPM) paired with a voice-coil actuator arm. These mechanical components strictly require 12V DC to generate sufficient electromagnetic torque to spin up and seek.
- Standard USB Limitations:
- Standard USB 2.0 (500mA) and USB 3.0 (900mA) Type-A ports on PCs output only 5V. They cannot produce 12V natively.
- Symptoms of Missing Power:
- If you plug a 3.5” desktop HDD into a bus-powered USB-to-SATA adapter without connecting the 12V DC power brick, the drive will produce faint clicking or buzzing noises, fail to spin up, and will never show up under
lsblk.
- If you plug a 3.5” desktop HDD into a bus-powered USB-to-SATA adapter without connecting the 12V DC power brick, the drive will produce faint clicking or buzzing noises, fail to spin up, and will never show up under
Special Warning for Android TV Boxes & Smartphones: Brownout Prevention
If you are using an old TV Box or an old phone/tablet:
- Do not rely on the device’s USB port to power any mechanical hard drive. The 5V bus power output on TV boxes and phones is designed for low-drain peripherals (flash drives, keyboards).
- When a mechanical hard drive (even a 2.5” laptop drive) spins up, its initial inrush current often exceeds 1.5A to 2A for a split second.
- On a phone or TV box, this current spike causes a voltage brownout, instantly crashing and rebooting the device!
- Solution: Always use a powered USB hub or a USB-to-SATA adapter with its own dedicated power adapter (12V for 3.5” drives, or a powered hub for 2.5” drives/phones). For smartphones, use a USB-C OTG Hub with Power Delivery (PD) so the phone charges while simultaneously connecting to the drive.
Step 1.1: Identify the Disk
Connect your SATA drive to the device (and plug in the 12V DC power brick if using a 3.5” drive). Boot up your machine and list all block devices:
lsblk -f
You should see your primary OS drive (often sda or nvme0n1) and your newly attached SATA drive (for example, sdb).
NAME   FSTYPE FSVER LABEL UUID                                 FSAVAIL FSUSE% MOUNTPOINTS
sdb
Step 1.2: Partition and Format the Disk
If the drive is fresh or needs reformatting with ext4 (recommended for native Linux stability and POSIX permission support):
# Partition with fdisk or parted (GPT recommended)
sudo fdisk /dev/sdb
Inside fdisk:
- Type
gto create a new GPT partition table. - Type
nto create a new partition (accept defaults for full capacity). - Type
wto write changes and exit.
Now format the partition /dev/sdb1 with ext4:
sudo mkfs.ext4 -L "NAS_DATA" /dev/sdb1
Tip: By default,
ext4reserves 5% of space for root. On large multi-terabyte drives, that can waste tens of gigabytes. Reduce it to 1% with:sudo tune2fs -m 1 /dev/sdb1
Step 1.3: Create a Mount Point and Configure /etc/fstab
Find the drive’s UUID:
sudo blkid /dev/sdb1
Copy the UUID="xxxxxxxx-xxxx-xxxx-xxxx-xxxxxxxxxxxx" value.
Create your mount target (we will use /srv/nas):
sudo mkdir -p /srv/nas
Edit /etc/fstab to ensure the disk mounts automatically on boot:
sudo nano /etc/fstab
Add the following entry at the bottom:
UUID=xxxxxxxx-xxxx-xxxx-xxxx-xxxxxxxxxxxx /srv/nas ext4 defaults,noatime,nofail 0 2
noatime: Avoids writing access timestamps whenever a file is read, reducing disk I/O and wear.nofail: Prevents the boot process from hanging if the drive is unplugged or fails to spin up.
Test the mount without rebooting:
sudo mount -a
df -h /srv/nas
2. Setup Server Name with .local Postfix (mDNS / Avahi)
Home Wi-Fi routers usually assign dynamic IP addresses via DHCP. If your router restarts or an IP lease expires, your NAS IP might change from 192.168.1.50 to 192.168.1.120, breaking all your bookmarked browser links and mapped network drives.
Instead of tracking dynamic IPs or manually configuring DNS records, you can broadcast your NAS hostname with a .local postfix using mDNS (Multicast DNS / Zeroconf) via Avahi.
This allows every device on your network (macOS, iOS, Windows 10/11, and Linux) to reach your server by simply typing nas.local.
Step 2.1: Set the Hostname
Set a clean, memorable hostname on your device (for example, nas):
sudo hostnamectl set-hostname nas
(On minimalist systems or Termux where hostnamectl is not available, write directly to /etc/hostname: echo "nas" | sudo tee /etc/hostname).
Next, update /etc/hosts to ensure local system utilities resolve the new name without delays:
sudo nano /etc/hosts
Ensure the loopback entries include nas:
127.0.0.1   localhost
127.0.1.1   nas
Step 2.2: Install and Enable Avahi Daemon
Install avahi-daemon on Debian, Ubuntu, or Armbian:
sudo apt update
sudo apt install -y avahi-daemon avahi-utils
Enable and start the service:
sudo systemctl enable avahi-daemon
sudo systemctl restart avahi-daemon
Step 2.3: Verify .local Resolution
Verify that Avahi is actively broadcasting your .local domain:
avahi-resolve -n nas.local
You should see output resolving nas.local to your machine’s current local IP address.
From any laptop, phone, or desktop connected to the same Wi-Fi/LAN, test connectivity:
ping nas.local
Now, wherever an IP address was previously required, you can use nas.local:
- SSH Access:
ssh youruser@nas.local - Transmission Web UI:
http://nas.local:9091 - Samba File Shares:
\\nas.local\NAS(Windows) orsmb://nas.local/NAS(macOS/Linux) - FTP Client:
ftp://nas.local
3. Directory Structure and Group Permissions with SGID
When running shared network folders alongside background services (like Transmission, Samba, or Jellyfin), permission conflicts are the #1 headache. If Transmission downloads a file with restrictive permissions, your regular user won’t be able to move or delete it.
We solve this using Linux User Groups, the SetGID (SGID) bit, and POSIX Default ACLs.
Step 3.1: Create a Shared Group
Create a unified group for all NAS consumers (e.g., nas-users) and add your daily user to it:
sudo groupadd nas-users
sudo usermod -aG nas-users $USER
(Log out and log back in, or run newgrp nas-users so your session recognizes the new group).
Step 3.2: Establish the Directory Layout
Create logical folders inside the mounted drive:
sudo mkdir -p /srv/nas/downloads/incomplete
sudo mkdir -p /srv/nas/downloads/complete
sudo mkdir -p /srv/nas/media/{movies,tv,music}
sudo mkdir -p /srv/nas/documents
sudo mkdir -p /srv/nas/backups
Step 3.3: Set Ownership and Group Inheritance (SGID)
Change the group ownership of /srv/nas to nas-users:
sudo chown -R $USER:nas-users /srv/nas
Now, enable the SGID bit (2xxx) on directories:
# Set directories to 2775 (rwxrwsr-x)
sudo find /srv/nas -type d -exec chmod 2775 {} +

# Set files to 0664 (rw-rw-r--)
sudo find /srv/nas -type f -exec chmod 0664 {} +
Why SGID (chmod g+s / 2775)?
Normally, when a user creates a new file or subfolder, it inherits that user’s primary group. With the SGID bit set on a parent directory, any newly created subfolder or file automatically inherits the parent folder’s group (nas-users), ensuring multi-user and daemon collaboration.
Step 3.4: Guarantee Write Access with Default POSIX ACLs
While SGID ensures the group name is inherited, default file creation masks (umask) could still omit group write permissions. To ensure every future file and folder is always group-writable:
sudo apt install -y acl
sudo setfacl -R -d -m g:nas-users:rwx /srv/nas
sudo setfacl -R -m g:nas-users:rwx /srv/nas
Now, regardless of which tool or user creates a file inside /srv/nas, members of nas-users will maintain full read and write access!
4. Install and Configure Transmission Daemon
Transmission is lightweight, uses minimal CPU and RAM, and features a clean web interface accessible across your local network.
Step 4.1: Install Transmission Daemon
sudo apt update
sudo apt install -y transmission-daemon
Step 4.2: Stop the Service Before Modifying Config
Important: Transmission writes its in-memory configuration back to disk when shutting down. If you edit
settings.jsonwhile the service is running, your changes will be completely overwritten.
Always stop the service first:
sudo systemctl stop transmission-daemon
Step 4.3: Find the Transmission System User & Add to nas-users
The system username under which transmission-daemon runs differs depending on your Linux distribution:
| Linux Distribution | Default User Name |
|---|---|
| Debian / Ubuntu / Raspberry Pi OS / Linux Mint | debian-transmission |
| Arch Linux / Manjaro | transmission |
| Fedora / RHEL / Rocky Linux / AlmaLinux | transmission |
| Alpine Linux / openSUSE | transmission |
If you are unsure of your distribution’s exact username, you can discover it dynamically using any of the following commands:
# Method 1: Query systemd unit definition (recommended)
systemctl cat transmission-daemon | grep -i 'User='

# Or query the property directly:
systemctl show -p User transmission-daemon

# Method 2: Search for transmission in /etc/passwd
grep -i 'transmission' /etc/passwd

# Method 3: If the daemon was running, inspect the process owner
ps -eo user,comm | grep -i transmission
Once you have identified the user (we will assume debian-transmission for Debian/Ubuntu, or replace with transmission on Arch/Fedora/Alpine), add it to nas-users:
# Replace with 'transmission' if on Arch/Fedora/Alpine
TR_USER="debian-transmission"

sudo usermod -aG nas-users $TR_USER
Verify that the user is now in the group:
id $TR_USER
Output should show groups=...,nas-users.
Step 4.4: Configure Transmission Settings
Open the configuration file:
sudo nano /etc/transmission-daemon/settings.json
Update the following key settings:
{
    ...
    "download-dir": "/srv/nas/downloads/complete",
    "incomplete-dir": "/srv/nas/downloads/incomplete",
    "incomplete-dir-enabled": true,
    "umask": 2,
    "rpc-enabled": true,
    "rpc-port": 9091,
    "rpc-whitelist-enabled": false,
    "rpc-authentication-required": true,
    "rpc-username": "admin",
    "rpc-password": "YourStrongPasswordHere",
    ...
}
Key options explained:
"umask": 2: Sets the decimal mask2(octal002). New files will be created with664(rw-rw-r--) and folders with775(rwxrwxr-x), allowing other members ofnas-usersto move or delete downloads."rpc-whitelist-enabled": false: Allows connections from any IP on your local subnet (or you can set"rpc-whitelist": "127.0.0.1,192.168.*.*")."rpc-password": Enter your password in plaintext. Transmission will automatically hash it with SHA-1 when the daemon restarts.
Step 4.5: Ensure Systemd UMask (Optional but Recommended)
Modern systemd unit files can enforce their own umask overriding Transmission’s config. To ensure Transmission always writes group-writable files:
sudo systemctl edit transmission-daemon
Add the following override lines:
[Service]
UMask=0002
Save and exit.
Step 4.6: Verify Permissions and Start the Daemon
Grant Transmission initial ownership over the download folders while maintaining group access:
# Uses $TR_USER from Step 4.3 (debian-transmission or transmission)
sudo chown -R $TR_USER:nas-users /srv/nas/downloads
sudo chmod -R 2775 /srv/nas/downloads
Reload systemd and start the daemon:
sudo systemctl daemon-reload
sudo systemctl start transmission-daemon
sudo systemctl enable transmission-daemon
5. Setup Samba (SMB/CIFS) for Cross-Platform File Sharing
Samba allows seamless access to /srv/nas directly from Windows Explorer, macOS Finder, Android, iOS, and smart TVs without extra client software.
Step 5.1: Install Samba
sudo apt install -y samba
Step 5.2: Configure the Samba Share
Back up the default configuration file:
sudo cp /etc/samba/smb.conf /etc/samba/smb.conf.bak
Edit /etc/samba/smb.conf:
sudo nano /etc/samba/smb.conf
Scroll to the bottom of the file and append our [NAS] share definition:
[NAS]
   comment = Home NAS Shared Storage
   path = /srv/nas
   browseable = yes
   read only = no
   guest ok = no
   valid users = @nas-users
   force group = nas-users
   create mask = 0664
   directory mask = 2775
   force create mode = 0664
   force directory mode = 2775
Why these parameters match our setup perfectly:
valid users = @nas-users: Only system users who belong to thenas-usersgroup are allowed to authenticate and access the share.force group = nas-users: Enforces group ownership on any newly uploaded file or directory.create mask = 0664&directory mask = 2775: Guarantees new files and folders retain group write permissions and the SGID bit.
Step 5.3: Set Samba Password for Users
Samba maintains its own password database separate from Linux system login passwords. Add your user account to Samba:
sudo smbpasswd -a $USER
Enter a secure password when prompted.
If you want to add another family member or a dedicated user:
# Create system user without a home directory and add to nas-users
sudo useradd -M -s /usr/sbin/nologin -g nas-users family
# Set their Samba access password
sudo smbpasswd -a family
Step 5.4: Restart and Enable Samba Services
sudo systemctl restart smbd nmbd
sudo systemctl enable smbd nmbd
Step 5.5: Connecting to the Share
Thanks to our .local hostname from Section 2, connecting is simpler than ever:
- Windows: Open File Explorer or press
Win + R, then enter\\nas.local\NAS(or\\<NAS_IP>\NAS). Log in using your username and the password created withsmbpasswd. - macOS: In Finder, press
Cmd + K, entersmb://nas.local/NAS, and click Connect. - Linux: Open your file manager (Nautilus, Dolphin) and navigate to
smb://nas.local/NAS.
6. Setup FTP (vsftpd) for Automated Transfers & Legacy Devices
While SMB is great for desktop file browsing, FTP/SFTP is ideal for legacy devices, IP security cameras streaming or archiving footage, microcontrollers, and fast batch automation scripts.
We will use vsftpd (Very Secure FTP Daemon), known for its lightweight footprint and high performance.
Step 6.1: Install vsftpd
sudo apt install -y vsftpd
Step 6.2: Configure vsftpd
Back up the default configuration:
sudo cp /etc/vsftpd.conf /etc/vsftpd.conf.bak
sudo nano /etc/vsftpd.conf
Replace or adjust the following configuration directives:
listen=NO
listen_ipv6=YES
anonymous_enable=NO
local_enable=YES
write_enable=YES
local_umask=002
dirmessage_enable=YES
use_localtime=YES
xferlog_enable=YES
connect_from_port_20=YES

# Lock local users into their chroot
chroot_local_user=YES
allow_writeable_chroot=YES

# Root directory for FTP sessions
local_root=/srv/nas

# Passive mode configuration for local network & firewalls
pasv_enable=YES
pasv_min_port=40000
pasv_max_port=40100
Key points:
local_umask=002: This matches Transmission’s umask! Any file uploaded through FTP will be created with664permissions (rw-rw-r--), so Transmission and Samba users can edit or delete them.local_root=/srv/nas: Drops FTP users directly into the NAS storage root.pasv_min_port=40000&pasv_max_port=40100: Limits passive port range, making firewall rules simple and predictable.
Step 6.3: (Optional) Create a Dedicated FTP User for IP Cameras or Backups
If you have an IP camera or automated tool, avoid using your personal account. Create a restricted user:
sudo useradd -M -s /usr/sbin/nologin -g nas-users camuser
sudo passwd camuser
Because camuser belongs to nas-users, any footage uploaded to /srv/nas will automatically be accessible across Samba and your other tools!
Step 6.4: Restart and Enable vsftpd
sudo systemctl restart vsftpd
sudo systemctl enable vsftpd
You can now connect via any FTP client (like FileZilla, Cyberduck, or the ftp CLI) using ftp://nas.local (or ftp://<NAS_IP_ADDRESS>).
7. Firewall Configuration with nftables (nft)
Modern Linux distributions (Debian 10+, Ubuntu 20.04+, and newer) use nftables as the default kernel packet filtering framework. Compared to legacy iptables and high-level wrappers like ufw, nftables features:
- A clean, unified syntax for both IPv4 and IPv6 (
inetfamily). - Atomic ruleset commits (no half-applied rule states).
- Native support for sets, ranges, and dictionary lookups, minimizing CPU overhead.
Step 7.1: Install and Enable nftables
Install the nftables package and ensure any conflicting firewall frontends (like ufw) are disabled:
sudo apt update
sudo apt install -y nftables

# If UFW was enabled, disable it to prevent conflicting rules
sudo ufw disable
Step 7.2: Configure /etc/nftables.conf
Back up the existing default template:
sudo cp /etc/nftables.conf /etc/nftables.conf.bak
sudo nano /etc/nftables.conf
Replace the content with the following comprehensive NAS ruleset:
#!/usr/sbin/nft -f

flush ruleset

table inet filter {
    # Define your trusted Local Area Network subnets
    # Adjust to your subnet (e.g., 192.168.1.0/24)
    define LAN_V4 = { 192.168.0.0/16, 10.0.0.0/8, 172.16.0.0/12 }

    chain input {
        type filter hook input priority filter; policy drop;

        # 1. Allow established and related traffic (state tracking)
        ct state established,related accept

        # 2. Drop invalid packets early
        ct state invalid drop

        # 3. Allow all traffic on loopback interface (localhost)
        iifname "lo" accept

        # 4. Allow ICMP (ping) for diagnostics
        ip protocol icmp accept
        ip6 nexthdr icmpv6 accept

        # 5. Admin access: SSH
        tcp dport 22 accept

        # 6. mDNS: Multicast DNS for .local hostname resolution (UDP 5353)
        udp dport 5353 accept

        # 7. Transmission BitTorrent Peer Traffic (must be open to all peers)
        tcp dport 51413 accept
        udp dport 51413 accept

        # -------------------------------------------------------------
        # LAN-Restricted Services (blocked from outside internet)
        # -------------------------------------------------------------

        # Transmission Web UI (9091)
        ip saddr $LAN_V4 tcp dport 9091 accept

        # Samba (SMB/CIFS)
        ip saddr $LAN_V4 tcp dport { 139, 445 } accept
        ip saddr $LAN_V4 udp dport { 137, 138 } accept

        # FTP (Control port 21 & Passive port range 40000-40100)
        ip saddr $LAN_V4 tcp dport 21 accept
        ip saddr $LAN_V4 tcp dport 40000-40100 accept

        # Reject all other incoming packets cleanly
        reject with icmpx type port-unreachable
    }

    chain forward {
        type filter hook forward priority filter; policy drop;
    }

    chain output {
        type filter hook output priority filter; policy accept;
    }
}
Why this configuration is secure:
- Default Drop Policy: Inbound connections are dropped unless explicitly permitted.
- LAN Isolation: Sensitive management endpoints (Transmission Web UI, Samba shares, and FTP) are only accessible from private IP addresses (
$LAN_V4). - Zero-Config Resolution: Opening UDP port
5353allowsavahi-daemonto answer mDNS queries sonas.localremains discoverable across your entire network. - Torrent Peer Access: Only port
51413(TCP/UDP) is open globally so other BitTorrent peers can seed and leech without exposing your internal services.
Step 7.3: Validate and Apply the Ruleset
Before restarting the service, test your ruleset syntax to avoid locking yourself out:
# Dry-run check (returns silent if valid, or outputs errors with line numbers)
sudo nft -c -f /etc/nftables.conf
If the validation check succeeds, load the ruleset immediately:
sudo nft -f /etc/nftables.conf
Enable and restart the nftables systemd service so your rules persist across reboots:
sudo systemctl restart nftables
sudo systemctl enable nftables
Step 7.4: Useful nft CLI Commands
Here are handy commands for inspecting and managing your firewall:
# View the full active ruleset
sudo nft list ruleset

# View the filter table only
sudo nft list table inet filter

# View rules with packet and byte counters
sudo nft -a list ruleset

# Temporarily flush all rules (for troubleshooting)
sudo nft flush ruleset
Note on UFW: If you prefer
ufw, the equivalent commands aresudo ufw allow 22/tcp,sudo ufw allow 5353/udp,sudo ufw allow 51413,sudo ufw allow from 192.168.0.0/16 to any port 9091 proto tcp,sudo ufw allow from 192.168.0.0/16 to any port 139,445 proto tcp, andsudo ufw allow from 192.168.0.0/16 to any port 21,40000:40100 proto tcp.
8. Verification: The Multi-Service Permission Test
The real test of a unified NAS setup is confirming that every service respects the nas-users group and SGID inheritance.
Test 1: Transmission Web Interface
Open your browser from another computer on the same network:
http://nas.local:9091
(or http://<NAS_IP_ADDRESS>:9091)
Log in with your username (admin) and the password you set in settings.json.
Test 2: File Creation Across Services
Let’s test file creation across our three services:
- Transmission: Creates a download file.
sudo -u debian-transmission touch /srv/nas/downloads/complete/transmission_file.txt - Samba: Drag and drop a file named
samba_file.txtfrom Windows or macOS into theNASshare. - FTP / Local User: Upload a file via FTP or touch one locally:
touch /srv/nas/documents/user_file.txt
Now check ownership and permissions inside /srv/nas:
ls -l /srv/nas/downloads/complete/transmission_file.txt
ls -l /srv/nas/documents/user_file.txt
Expected output:
-rw-rw-r-- 1 debian-transmission nas-users 0 Nov 12 11:38 transmission_file.txt
-rw-rw-r-- 1 youruser            nas-users 0 Nov 12 11:38 user_file.txt
Notice:
- Both files belong to the
nas-usersgroup automatically. - Both files have
rw-rw-r--permissions. - Any user in
nas-userscan modify, move, or delete files created by any other service!
9. Next Steps
With your storage mounted, .local domain broadcasting, Transmission downloading headlessly, Samba sharing across all personal devices, and FTP open for camera feeds or script automations:
- Media Streaming: Spin up a Docker container with Jellyfin or Plex, mounting
/srv/nas/mediaand/srv/nas/downloads/completeas read-only volumes. - Automation (*arr Stack): Install Sonarr and Radarr to automatically send torrents to Transmission and organize them into
/srv/nas/media. - Disk Health Monitoring: Install
smartmontools(sudo apt install smartmontools) and run periodic health checks on your SATA drive (sudo smartctl -H /dev/sdb).
Enjoy breathing new life into your old hardware!
Author’s Note
Note: This tutorial was written with AI assistance under hands-on human technical guidance and real-world testing.
The setup, permission architecture, and firewall rules in this guide were verified and deployed on an H96 MAX TV Box (Rockchip):
- Processor (SoC): Rockchip RK3318 (Quad-Core 64-bit ARM Cortex-A53 @ up to 1.5 GHz)
- GPU: Mali-450 Penta-Core
- Memory (RAM): 4 GB DDR3
- Internal Storage: 32 GB / 64 GB eMMC (flashed with Armbian Server)
- Connectivity: 100M Ethernet, Dual-Band 2.4G/5G Wi-Fi, Bluetooth 4.0
- I/O Ports: 1x USB 3.0 (connected to the SATA 3 adapter), 1x USB 2.0, TF/MicroSD slot
- Operating System: Armbian (Debian/Ubuntu Server port for Rockchip RK3318/RK3328)
- Storage Attached: 3.5” SATA 3 HDD via an externally powered (12V/2A DC) USB 3.0 to SATA adapter